September 26, 2015 | Posted in TRADITIONAL ART AND PAINTING | By sockii
How To Paint Realistic Flesh Tones

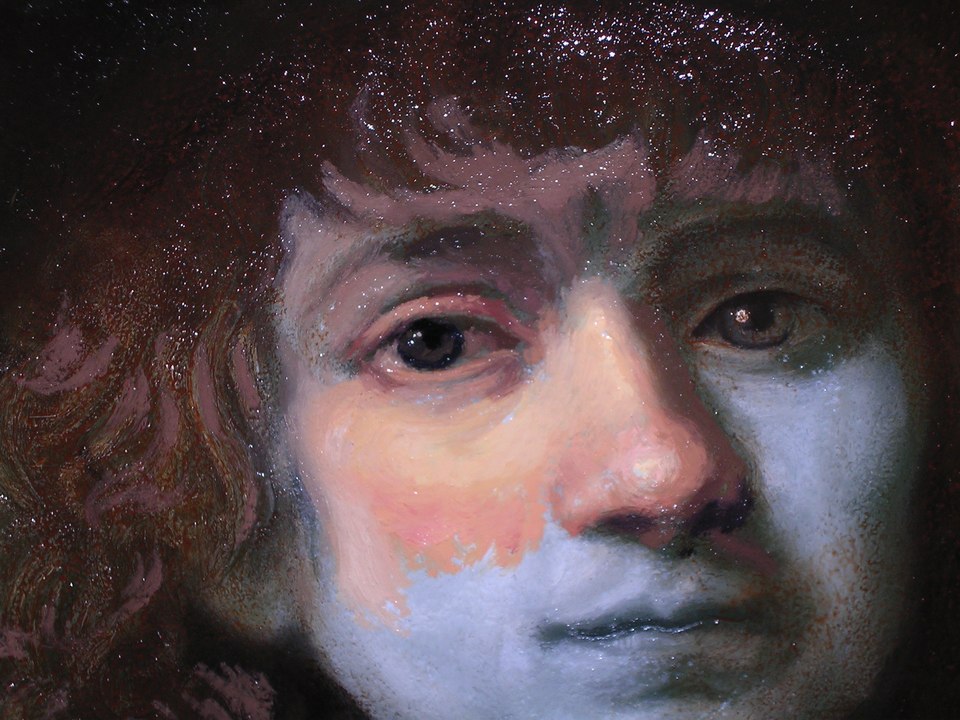
Close-up of “Psyche” by William-Adolphe Bouguereau
Ask any artist who does portrait or figure painting and they will tell you that mixing and applying realistic flesh tones is one of the hardest challenges they face. The Old Master artists were able to achieve wonderfully luminous and vibrant flesh tones in their paintings – what were their secrets?
While I am no Old Master, I have studied their techniques and methods seriously for several years. My own portrait and figure paintings have improved dramatically through studying Renaissance and Classical Realist artists and their methods. Here I will present some general tips and suggestions for improving flesh tones in your own artwork, based on their Old Master techniques and methods. These suggestions largely apply primarily to oil painting, although some may be useful in acrylic and watercolor painting as well.
1. Throw Away Any Premade “Flesh Tone” Paints
WHY PRE-PREPARED FLESH HUES ARE A BAD IDEA

Don’t buy premixed flesh hue. It’s only good for painting Barbie dolls. (Image source)
The first thing to do, in order to paint realistic flesh tones, is get rid of any premade, prepackaged flesh tone hues – like this one. If you think you’re going to “shortcut” to painting skin by simply using a color like this, and perhaps shading and tinting it up and down? Think again. You’ll end up with a painted figure that looks like a Barbie Doll.
The reason is our skin is far too complicated and multi-hued to simply be mixed and put in a tube or bottle. Study your hands: notice how the fingertips are more red, from blood flow? Notice the cool blue under your wrist from veins? Do the same with your face: Notice how the skin on your forehead, where the skull is only thinly covered, is much cooler in hue than your cheeks, your nose, the skin around your eyes. Notice how beard stubble can make a man’s chin and jaw line appear grayish.
Our flesh is not one uniform color all over our bodies. Neither, of course, are we all one pale shade of pinkish-orange! Some individuals have much darker pigmentation, or more olive-green tones to the skin. “Flesh tone hue” ready-made from the store is never going to be able to capture all of these natural variations.
2. Try a Palette of Primarily Earth Tones
CLASSICAL ARTISTS USED EARTH TONES FOR PAINTING FLESH

Self-portrait as the Sick Bacchus by Caravaggio.
It was not until the 18th century that the color wheel and color wheel theory began to influence artists and their use of color. The Impressionists emphasized the use of primary and secondary colors only, and the idea of placing complementary colors next to each other (ie, yellow and purple, red and green, blue and orange) for shadow and dynamic effect.
The Old Masters, however, used a painting palette based primarily around earth tone pigments. Many of these pigments are natural choices for painting skin tones and can blend together beautifully for realistic effect. Author/artist Joseph Sheppard, in his book How to Paint Like the Old Masters, recommends the following commercial paints for todays’ artists looking to paint in a classical style:
- Alizarin Crimson
- Burnt Sienna
- Burnt Umber
- Cadmium Red
- Cadmium Yellow
- Cerulean Blue
- Chrome Yellow
- Ivory Black
- Naples Yellow

“How to Paint Like the Old Masters” by Joseph Sheppard. Book available at Amazon.
- Prussian Blue
- Raw Sienna
- Raw Umber
- Rose Madder
- Red Ochre
- Ultramarine Blue
- Vermillion
- White Lead (Flake white)
- Yellow Ochre
With this palette, virtually any color an artist could need can be mixed – including much more realistic greens than can typically be purchased pre-prepared. If I could add one color to this list myself, it would be Cadmium Orange, which I find provides a much more vibrant orange than one mixed from Cadmium Red and Cadmium Yellow. However, its use of course would depend on the subject at hand, and whether his or her skin is especially ruddy, or more pale.
3. Begin with a Monochromatic Underpainting
BETTER FLESH TONES BY SEPARATING HUE FROM VALUE AND FORM
Flesh tone being applied over a verdaccio underpainting. Photo by sockii.
Many classical artists began their paintings with a monochromatic underdrawing and/or underpainting. By concentrating first on strictly establishing form, likeness and value (light to dark), the artist does not have to worry about color at all until after the image is set and fully developed. The underpainting can also help develop the later flesh tones and their color quality, particularly if applied thinly to allow some of the underpainting to be seen through in the final work.
The two types of underpainting most typically used in classical artwork are verdaccio and grisaille. Verdaccio, which is a greenish-tinged underpainting, especially can bring out the vibrancy of flesh tones applied over it as green is the complementary color of red. Grisaille is a more traditionally French technique of creating a purely gray underpainting, which tends to work best for very pale flesh, giving the painting a cooler appearance.
I very much encourage especially beginning or struggling artists to experiment with giving the verdaccio or grisaille methods a try. It can certainly help with some of the frustration of trying to develop all aspects of a painting at once by breaking the process down into simpler steps – including the creation of realistic skin tones.
For More Information on Verdaccio and Grisaille…
Please see these art tutorials
These two art tutorials will explain in more detail the process of verdaccio and grisaille underpainting.
What is Verdaccio and How To Use It In Your Paintings
Verdaccio is an underpainting technique – and specific paint color – which originates from the Italian fresco painters of the early Renaissance…
Using Grisaille and Glazing Techniques to Reproduce an Old Master Painting
Grisaille is a fine arts term applied to a monochromatic, grayscale style of painting…
4. Establish Surrounding Colors First, Before Painting the Flesh Tones
COLORS CAN APPEAR DIFFERENT, DEPENDING ON NEIGHBORING COLOR PLACEMENT

How changing background color affects the appearance of flesh tones.
The image above shows one of my own paintings in progress, after I decided I wanted to go with a darker rather than lighter background. I have actually done nothing to change the flesh tones between these two steps, but notice how much paler the skin tones now appear? By darkening the background I have changed how our eyes perceive the colors of the portrait subject’s face. I then had to go and adjust the skin tones so that my subject didn’t appear so “ghostly”, yet the skin tones had appeared fine in contrast to the lighter background.
This phenomenon is why many portrait artists, including classical artists, would at least paint a “halo” of background color around the focus of their painting before beginning on painting the flesh tones. Set the background and other large, colorful volumes first, and your flesh tones will be easier to establish more accurately so as not to be too light or too dark in the final work.
5. Mix No More Than Three Colors at One Time

Flemish-school artists, such as Albrecht Durer, created wonderful effects through thin color glazes.
KEEP SKIN TONES VIBRANT AND CLEAN
If you want to preserve the clarity and vibrancy of your skin tones, try to limit each color you mix to no more than three pigments at a time. For example, if you’re mixing a bright skin tone to represent an area of flesh in direct sunlight, try a mixture of Yellow Ochre, Flake White and just a touch of Cadmium Orange. For reddish-hued cheeks or the tip of the nose, try Burnt Sienna, Yellow Ochre and a touch of Vermillion.
Keep mixing fresh colors for every different area of the flesh, instead of making one big pile of “skin color” and just adding more and more lighteners or darkeners to it. Mixing more than three pigments together at once will often muddy your colors and make them turn gray and lifeless. A better option for adding more color, if adjustment is needed, is to later “glaze” thin layers of color on top of what has been previously painted. Glazing will not cause that muddy/dull effect and can very effectively create more subtle and rich colors for a final work.
Pro-Tip: Make Color Charts
Preparing color charts are a great way to become more familiar with how particular paint colors and pigments mix. Make your own color charts with test combinations for flesh tones to improve your work.
6. For Better Skin Tones? Practice Painting Onions!
FLESH AND ONION SKIN ARE REMARKABLY SIMILAR
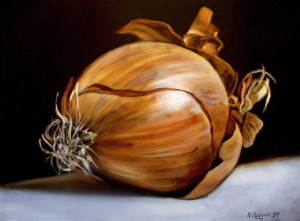
Still Life with Onion by the author, sockii. Check out great merchandise with this painting at CafePress!
Here’s a surprising tip I learned from one of my art teachers in a figure painting class. If you want to get better at mixing and painting realistic flesh tones, practice by painting onions. Onion skin is very similar to human skin as far as the palette of colors required to paint them. Onion skins also show remarkable variation in light to dark shading, cool and warm colors, and differences in base pigmentation.
So take a break from painting faces and bodies for a while, and pick up a bag of onions at the supermarket. You’ll be amazed at how much you can learn by painting some still life pictures of onions for a change!
For More Information…

“Controlled Painting” by Frank Covino. Book available at Amazon.
Frank Covino‘s portrait painting and classical art books and video tutorials are in high demand by artists everywhere, who have come to appreciate the value of the techniques he teaches. I learned much of the technique I use today, including the methods and tips discussed here, after taking several of his workshops and studying his lessons carefully.
While his books on painting are out-of-print, you can usually find used copies available for sale on Amazon or eBay. They are definitely worth seeking out if you’d like to know more about classical methods and the way to capture truly realistic images in your artwork. “Controlled Painting” is the title I especially recommend to anyone interested in learning more on this subject.


Share this:

Table of Contents
- How To Paint Realistic Flesh Tones
- 1. Throw Away Any Premade “Flesh Tone” Paints
- 2. Try a Palette of Primarily Earth Tones
- 3. Begin with a Monochromatic Underpainting
- 4. Establish Surrounding Colors First, Before Painting the Flesh Tones
- 5. Mix No More Than Three Colors at One Time
- 6. For Better Skin Tones? Practice Painting Onions!
- For More Information…
sockii
sockii is just your typical Jane-of-All-Trades who never has enough time in her day for all of her projects. She has written for many websites online including Squidoo, Zujava, Yahoo! Contributors Network, HubPages and Wizzley. She has been attending and vending at science fiction and media conventions for over 15 years, and for several years ran an art gallery and jewelry store in Philadelphia. Today she is happy to be living in South Jersey with her partner David and their 6 cats. Sockii is a member of several affiliate sales programs including Amazon Associates and Viglink. Products from these services may be advertised on her posts and pages to generate sales commissions.
1 Comment
Leave a Reply
*


John Rea
February 6, 2018
Absolutely efen brilliant !!!!!!!